首先,你需要一个pn532_nfc模块,
然后,使用杜邦线与树莓派相连,连接方式是
5v <==> 5v
GND <==> GND
SDA <==> SDA
SCL <==> SCL
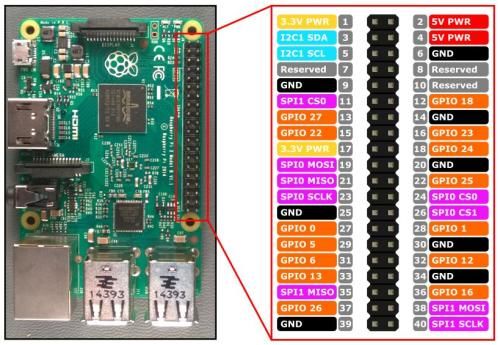
顺便附一张树莓派引脚图
这里用的是I2C接口传输数据,将pn523上的开关调到SET0-->H,SET1-->L
然后设置树莓派
sudo raspi-config在rasp-config里将i2c打开,重启之后应该有/dev/i2c-1
执行 i2cdetect -y 1 ,如果出现的不全是横杠,就代表连接成功了,
然后在树莓派上安装必要的库
sudo apt-get install libusb-dev libpcsclite-dev automake autoconf然后编译安装libnfc
wget http://dl.bintray.com/nfc-tools/sources/libnfc-1.7.1.tar.bz2
tar -xf libnfc-1.7.1.tar.bz2
cd libnfc-1.7.1
./configure --prefix=/usr --sysconfdir=/etc
make
sudo make install
然后添加配置文件
cd /etc
sudo mkdir nfc
sudo nano /etc/nfc/libnfc.conf
如下
# Allow device auto-detection (default: true)
# Note: if this auto-detection is disabled, user has to manually set a device
# configuration using file or environment variable
allow_autoscan = true

# Allow intrusive auto-detection (default: false)
# Warning: intrusive auto-detection can seriously disturb other devices
# This option is not recommended, so user should prefer to add manually his/her device.
allow_intrusive_scan = false

# Set log level (default: error)
# Valid log levels are (in order of verbosity): 0 (none), 1 (error), 2 (info), 3 (debug)
# Note: if you compiled with --enable-debug option, the default log level is "debug"
log_level = 1

# Manually set default device (no default)
# To set a default device, users must set both name and connstring for their device
# Note: if autoscan is enabled, default device will be the first device available in device list.
device.name = "Itead_PN532_I2C"
device.connstring = "pn532_i2c:/dev/i2c-1"
然后放上一张卡,执行
nfc-list显示如下
root@raspberrypi:~# nfc-list
nfc-list uses libnfc 1.7.1
NFC device: pn532_i2c:/dev/i2c-1 opened
1 ISO14443A passive target(s) found:
ISO/IEC 14443A (106 kbps) target:
    ATQA (SENS_RES): XX XX
       UID (NFCID1): XX XX XX XX
      SAK (SEL_RES): XX
libnfc到这里安装结束了
安装mfoc和mfcuk
mfoc(破解key,读出数据到文件):https://github.com/nfc-tools/mfoc
mfuck(破解全加密数据):https://github.com/nfc-tools/mfcuk
后两个下载解压后切换到目录里执行:
automake
autoconf
autoreconf -is
./configure
make
make install
读写数据
mfoc -O output.mfd # 读出卡中的数据保存为文件output.mfd mfoc 是读取数据,如果有加密就自动破解,如果全加密,就没法读取,可用mfuck命令破解。
mfcuk -C -R 0:A -v 2写入数据
nfc-mfclassic w a output.mfd output.mfd # 写入数据,w小写,如果大写是强写0扇区由于每张卡的0扇区信息(UID)不一样,0扇区又不可写,不同的卡没法互写。但是可以买一张0扇区可写的UID卡。
本文由树莓派俱乐部总结编辑,转载请注明